
Sequential Timer Problems: Dust Collector Cleaning Fixes
Differential pressure keeps climbing. Filter bags look blinded. The pulse valves are new, the compressed air pressure reads fine, and still the dust collector isn’t cleaning the way it should. In situations like this, most teams start with the filter bags or the valves. That’s logical, but it often means hours of work before anyone looks at the sequential timer, the small control unit that decides which valve fires, for how long, and when.
A sequential timer fault doesn’t always announce itself. A dead channel, a drifted setting, or a loose terminal can leave one row of bags uncleaned while everything else appears to run normally. This guide walks through the sequential timer problems worth checking first, what each one looks like on the plant floor, and how to confirm and fix it.
Safety note: isolate and lock out the power supply before opening the control panel or touching any terminal. Voltage checks on live terminals should be done only by a qualified electrician following your plant’s safety procedures.
How a Sequential Timer Controls Dust Collector Cleaning
A sequential timer, also called a sequential timer controller, sequential controller, or sequence controller, sends timed electrical signals to each pulse jet solenoid valve in turn. Each signal opens a valve for a short pulse, usually between 50 and 150 milliseconds, releasing compressed air into a row of filter bags.
Three settings shape the whole cleaning cycle:
- Pulse duration (on-time): how long each valve stays open.
- Pulse interval (off-time): the pause between one valve firing and the next.
- Channel sequence: the order and number of valves being driven.
If any of these drift, fail, or are set wrongly, cleaning suffers. And because the filter keeps running, the fault can go unnoticed until differential pressure forces attention.
Is It Really the Sequential Timer? A Quick Triage
Before opening the panel, a few observations help narrow the cause.
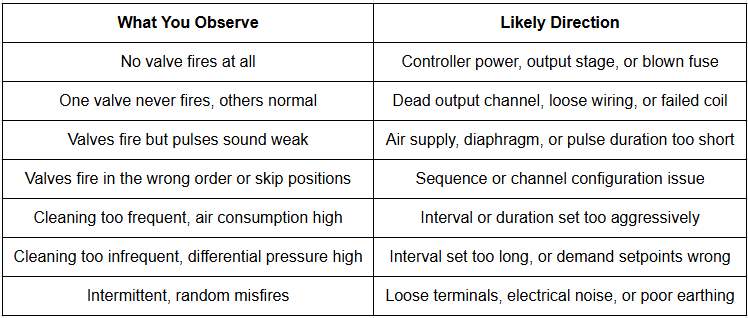
If a valve clicks but produces no pulse, the problem is more likely downstream of the timer (coil, pilot, diaphragm). If there is no click and no activity, the signal isn’t reaching the valve, which points back to the timer or wiring.
Problem 1: No Output From the Controller
Symptom: The whole cleaning system is silent. No valve fires. Differential pressure climbs steadily.
Common causes:
- Loss of supply voltage to the controller
- Blown fuse or tripped protection device
- Failed power section or output stage inside the controller
- Controller left in a stopped or manual mode after maintenance
What to check:
- Confirm the supply voltage is reaching the controller terminals.
- Check fuses and breakers upstream.
- Confirm the run/stop or auto/manual selection is correct.
- Look for status indication. Most solid-state units show a power or run indicator.
Fix: Restore supply, replace the fuse (with the correct rating), or reset the mode. If the controller powers up but still gives no output, the output stage may need repair or replacement.
Problem 2: One Channel Not Firing
Symptom: One row of bags is consistently dirtier than the rest. During a manual test, one valve stays silent.
Common causes:
- Loose or corroded wire at the controller output terminal
- Damaged cable between the panel and the valve
- Failed solenoid coil on that valve
- Failed output driver on that channel inside the controller
What to check:
- Run a manual or test cycle and watch the channel status indicator for that position.
- If the indicator shows the channel active, measure output voltage at the valve terminal during the pulse.
- If voltage is present at the valve but the valve doesn’t respond, the coil or valve is at fault.
- If no voltage reaches the valve, trace back through the cable and controller terminal.
Fix: Re-terminate or replace the wiring, replace the coil, or move the valve to a spare channel if one is available while the controller is repaired.
This is the problem most often misdiagnosed as a “bad valve.” Measuring before replacing saves a part and an hour.
Problem 3: Pulse Duration Set Too Short or Too Long
Symptom: Valves fire, but cleaning is poor (too short), or compressed air consumption is high with no extra benefit (too long).
Why it happens: Settings are changed during troubleshooting and never restored, or the original commissioning values were never documented.
What to check: Compare current pulse duration against the commissioned value or the valve manufacturer’s recommended range. Listen to the pulse. A very short pulse sounds thin and brief; an overly long one releases air long after the useful cleaning burst.
Fix: Return to a documented baseline, then adjust in small steps while watching differential pressure and manifold pressure. Record the final value.
Problem 4: Pulse Interval Too Short for Manifold Recovery
Symptom: Early pulses in the sequence clean well; later ones seem weak. Differential pressure stays higher than expected even though the timer is “running a lot.”
Why it happens: If the pause between pulses is shorter than the time the manifold needs to recover pressure, each successive pulse is weaker than the last.
What to check: Put a pressure gauge on the manifold and watch it during a cleaning cycle. If pressure hasn’t recovered to normal before the next valve fires, the interval is too short, or the compressed air supply is undersized for the valve count.
Fix: Lengthen the interval until the manifold pressure recovers between pulses. If that makes cleaning too infrequent, the real issue may be air supply capacity rather than the timer.
Problem 5: Pulse Interval Too Long
Symptom: Bags load up between cleaning cycles. Differential pressure swings widely and spends long periods near the upper limit.
Why it happens: An interval that was suitable for a lighter dust load becomes too long when production or dust loading increases.
What to check: Review whether dust loading, throughput, or process conditions have changed since commissioning. Compare the full cycle time (interval multiplied by the number of valves) against how fast differential pressure rises.
Fix: Shorten the interval in measured steps, confirming manifold recovery each time. If your controller supports differential pressure-based cleaning, consider using it so cleaning follows actual filter conditions.
Problem 6: Wrong Number of Active Channels
Symptom: Some valves never fire even though they’re wired correctly, or the controller spends time cycling through channels with no valve attached.
Why it happens: The active channel count was set for an earlier configuration. After filter expansion or valve changes, the setting wasn’t updated.
What to check: Compare the number of active channels on the controller with the number of installed valves.
Fix: Set the active channel count to match the installation. When adding valves, confirm the controller has spare capacity or consider an expandable model.
Problem 7: Loose Terminals, Poor Earthing, and Electrical Noise
Symptom: Random misfires, occasional missed pulses, or behaviour that changes when nearby motors or drives start.
Why it happens: Vibration loosens terminal screws over time. Poor earthing of the panel or noisy electrical surroundings can disturb timing and output behaviour.
What to check:
- With power isolated, inspect and tighten terminal connections.
- Check panel earthing and the earth connection of the controller.
- Look for control cables routed alongside heavy power cables.
- Check for signs of heat discoloration at terminals.
Fix: Re-terminate, correct the earthing, and separate control wiring from high-power cables where possible.
Problem 8: Coil Voltage and Controller Output Mismatch
Symptom: Valves fail to open, or coils burn out repeatedly right after replacement.
Why it happens: The controller output voltage and the solenoid coil rating don’t match. This commonly appears after a coil or controller replacement when the original specification wasn’t recorded.
What to check: Compare the controller output rating with the coil voltage printed on the solenoid. Common industrial options are 24V DC, 110V AC, and 230V AC. Confirm which your system actually uses.
Fix: Use coils matched to the controller output, or a controller matched to the installed coils. Never assume. Verify and record the voltage.
Problem 9: Settings Changed and Never Documented
Symptom: The system performed well once, then drifted. Nobody knows the original settings.
Why it happens: Well-meaning adjustments during earlier troubleshooting. Over time, the controller ends up far from the commissioned values.
What to check: Look for any commissioning record or maintenance log of pulse duration, interval, and channel settings.
Fix: Re-establish a documented baseline: set, test, record, and label the panel. Treat controller settings like any other controlled maintenance parameter.
Problem 10: An Ageing Controller Reaching End of Life
Symptom: Frequent, hard-to-trace faults on a controller that has been in service for many years, especially older electromechanical timers.
Why it happens: Mechanical wear in cam-type timers and contact degradation over millions of operations can change timing and cause failures that adjustment can’t cure.
What to check: Age and type of the unit, history of repeated faults, and availability of spare parts.
Fix: Evaluate replacement with a solid-state sequential controller, which has no mechanical timing parts and typically offers wider adjustment, status indication, and optional differential pressure control.
Step-by-Step: A Practical Sequential Timer Check
If you want a repeatable routine, this order works well for most plants:
- Observe first. Note differential pressure, which rows look dirty, and whether any valve is silent.
- Run a manual test cycle. Watch the channel indicators and listen to each valve.
- Check power and mode. Supply present, fuse intact, controller in the correct mode.
- Verify settings. Pulse duration, interval, and active channels against the documented baseline.
- Measure at the valve. Confirm output voltage reaches any silent valve during its pulse.
- Check the manifold. Pressure level and recovery between pulses.
- Inspect wiring and earthing with power isolated.
- Only then move on to coils, pilot passages, and diaphragms.
This sequence keeps you from replacing healthy valves because of a control-side fault.
Repair or Replace? Thinking About Sequence Controller Price
When a controller keeps causing problems, the question becomes whether to repair or replace. Sequence controller price varies with the number of output channels, adjustment range, status indication, differential pressure input, alarm output, and enclosure rating.
A few practical points when comparing:
- Channel count: make sure the controller covers your valve count, with spare capacity if expansion is likely.
- Features that cut downtime: per-channel indicators and alarm output speed up diagnosis.
- What’s included: confirm whether the enclosure, terminals, and wiring accessories are at the quoted price.
- Support: domestic technical help and spare parts matter more than a small difference in purchase price.
Comparing total cost of ownership over several years, including downtime and maintenance labour, gives a fairer picture than comparing purchase price alone.
A Note on “Sequence Controller for Burner”
Searches for a sequence controller for burner applications return a different product category. Burner sequence controllers manage the start-up, purge, ignition, and shutdown of combustion equipment, a safety-related function with its own standards. They are not interchangeable with a sequential timer used for pulse jet bag filter cleaning, even though the names overlap. When specifying or replacing a controller for a dust collector, confirm it is designed for pulse valve sequencing.
Preventive Habits That Avoid Sequential Timer Problems
- Record the commissioned settings and keep them with the panel.
- Run a manual test cycle at every scheduled maintenance visit.
- Tighten terminals and check earthing periodically, especially in high-vibration areas.
- Track differential pressure trends so drift is caught early.
- Keep a spare controller or output module for critical installations.
- Review settings after major changes, such as bag replacement, valve replacement, or process changes.
Frequently Asked Questions
What is a sequential timer in a dust collector?
A sequential timer is the control unit that sends timed electrical signals to each pulse jet solenoid valve in turn, controlling which valve fires, how long it stays open, and how long the pause is before the next one. It coordinates the compressed air pulses that clean the filter bags in a reverse pulse jet dust collector.
Why is my dust collector not cleaning even though the valves are new?
New valves don’t help if the signal never reaches them or if the settings are wrong. Check that the sequential timer is powered and in the correct mode, that every channel is firing during a test cycle, that pulse duration and interval match the baseline, and that manifold pressure recovers between pulses. Many “valve problems” turn out to be control or air supply problems.
How do I know if a sequential controller channel has failed?
Run a test cycle and watch the channel indicator for the suspect position. If the indicator shows the channel active but no voltage appears at the valve terminal during the pulse, the fault is in the cable or the controller output. If voltage reaches the valve but the valve stays silent, check the coil and valve instead.
What pulse duration and interval should I set on a sequential timer?
There is no single correct value. Pulse duration is commonly in the range of tens to a little over a hundred milliseconds, but the right setting depends on valve size, manifold pressure, blow pipe design, and bag type. Start with the valve manufacturer’s recommendation, then adjust while monitoring differential pressure and manifold pressure recovery, and record the final settings.
Is a sequence controller for burners the same as a dust collector sequential timer?
No. A burner sequence controller manages ignition and shutdown sequences for combustion equipment and is a safety-related device. A sequential timer for dust collection sequences pulse valves for bag cleaning. The names are similar, but the products and applications are different, so don’t substitute one for the other.
When should I replace the sequential timer controller instead of repairing it?
Consider replacement when faults repeat despite checks and repairs, when the unit is an old electromechanical timer with worn parts, when spares are hard to find, or when you want features like per-channel indication, wider adjustment, or differential pressure control. Compare the sequence controller price against the downtime and maintenance cost of keeping the old unit running.
How often should the sequential timer be checked?
A manual test cycle at each scheduled maintenance visit is a sensible routine. Terminal tightness, earthing, and setting verification can be added at least annually, or sooner in high-vibration or high-dust environments. Monitoring differential pressure trends between visits gives early warning of problems.
Conclusion
When a dust collector isn’t cleaned properly, the sequential timer is one of the cheapest and quickest things to check, yet it is often the last. A dead channel, a drifted setting, a loose terminal, or a voltage mismatch can each reduce cleaning effectiveness while the rest of the system looks healthy.
Working through the checks in this guide, in order, helps you find the real cause before replacing parts that were never faulty. Keeping documented settings, running regular test cycles, and choosing a reliable sequential timer controller from a manufacturer that supports it afterwards will make future faults easier to catch.
Not sure whether your sequential timer is the problem?
Maniks has manufactured sequential timer controllers and dust collector components for over 47 years, serving cement, steel, power, pharmaceutical, chemical, and other industrial sectors. If your bag filter cleaning isn’t performing as expected, our technical team can help you work through the symptoms and identify whether a repair, a setting change, or a replacement controller is the right step.
Whether you need to match a controller to your existing valves, replace an ageing timer, or understand which features suit your installation, we’re ready to help.
Explore the Maniks Solid-State Sequential Controller or contact us for technical assistance and a quotation.